

Tape and Float Drywall sets the stage for a detailed look at a crucial technique in drywall finishing. This method, often used in both residential and commercial projects, involves meticulously preparing surfaces, applying tape, layering joint compound, and finally smoothing the walls to a flawless finish. We’ll delve into the steps, materials, and considerations to ensure a successful outcome, from initial preparation to final inspection.
Understanding the advantages and disadvantages of this technique is vital. This method, while often favored for its precision, does require time and attention to detail. The steps involved, from patching imperfections to floating the surface, are key to achieving a professional-looking result.
Introduction to Tape and Float Drywall
The tape and float method is a widely used technique in drywall finishing. It’s a crucial step in achieving a smooth, professional-looking surface after installing drywall panels. This method involves carefully applying joint compound to seams and imperfections, then smoothing it out with a tool called a float.This method is particularly effective for creating a seamless and even surface, minimizing the visibility of joints and providing a clean finish for painting or other decorative treatments.
Understanding the process, tools, and materials involved can significantly impact the outcome of the project.
Tape and Float Drywall Method Explanation
The tape and float method involves several steps for achieving a seamless drywall finish. First, drywall joints are taped with a fiberglass tape. This tape is crucial for reinforcing the seams and preventing cracks in the joint compound. Then, a layer of joint compound is applied over the tape. This compound acts as a binder, filling the gaps and smoothing the surface.
Finally, a drywall float is used to spread and smooth the compound, creating a level and even finish.
Steps Involved in the Tape and Float Method
The process typically involves these steps:
- Preparing the Joints: Carefully measure and mark the joints between drywall panels. Use a utility knife to score the edges of the drywall where the joints will be, creating a clean and consistent surface for taping. Then, apply a thin bead of drywall mud along the joints. This is done before taping to ensure a good bond between the compound and the tape.
- Applying Tape: Use fiberglass tape to cover the joints. Ensure the tape is firmly pressed against the drywall, completely covering the joint. A good overlap of the tape is important to maintain the structural integrity.
- Applying Joint Compound: Apply a layer of joint compound over the taped joints. Use a taping knife to spread the compound evenly over the tape, ensuring it completely covers the tape and fills any gaps or voids. Ensure the compound is applied in a smooth, consistent manner to avoid creating uneven surfaces. Apply a thin, even layer for a good finish, as multiple layers will take more time to dry.
- Floating the Surface: Use a drywall float to smooth the compound. Gently move the float across the surface, ensuring the compound is evenly distributed and any imperfections are removed. Apply consistent pressure to achieve a smooth, level surface.
- Drying and Sanding: Allow the joint compound to dry completely before sanding. Use a sanding sponge or a sanding block to gently smooth out any bumps or uneven areas. Sanding ensures a level and uniform surface. Avoid excessive pressure during sanding.
Tools and Materials Used
Essential tools and materials for the tape and float method include:
- Drywall Tape: Fiberglass tape is the most common choice, providing strength and flexibility.
- Joint Compound: Various types of joint compound are available, ranging in texture and application. Choose the right type based on the project’s requirements.
- Drywall Knife: A taping knife is used to apply the joint compound and spread it evenly. A variety of sizes is available, based on the project’s requirements.
- Drywall Float: A float is used to smooth the compound and achieve a flat surface. Different sizes and shapes of floats are available.
- Sandpaper: Various grits of sandpaper are used to smooth out imperfections after the compound dries. Sandpaper can be used on a block or a sponge for various levels of finish.
- Measuring Tape, Utility Knife, Putty Knife, Level: Additional tools required for preparation.
Purpose of Using This Method
The tape and float method is used to create a seamless and professional finish on drywall. It’s an important part of the drywall finishing process, providing a durable and aesthetically pleasing surface. The method allows for the filling of imperfections and irregularities, making the drywall look smooth and even, ready for painting or other decorative finishes.
Advantages and Disadvantages of Tape and Float Drywall
| Advantages | Disadvantages |
|---|---|
| Creates a smooth, professional finish | Requires precision and patience |
| Effective for covering imperfections | Can be time-consuming |
| Relatively inexpensive compared to other methods | Needs careful drying and sanding to avoid damage |
| Easy to learn with practice | Requires specialized tools |
Preparation for Tape and Float
Getting your drywall ready for taping and floating is crucial for a professional-looking finish. Proper surface preparation minimizes issues like bubbling, cracking, and uneven surfaces later on. This meticulous process ensures a strong bond between the tape and the drywall, leading to a durable and aesthetically pleasing result.Surface preparation is a vital step in the drywall installation process.
It involves several key actions, from removing loose debris to patching imperfections. The goal is to create a smooth, stable surface that’s ready to receive the tape and compound. This thorough preparation directly impacts the quality of the final result.
Surface Preparation Steps
Thorough surface preparation is essential for achieving a seamless finish. This involves meticulous steps to ensure a clean and stable substrate for the tape and compound. The more diligently you follow these steps, the more successful your drywall project will be.
- Remove any loose or flaking paint, old tape, or debris. Use a putty knife or scraper to carefully remove any unwanted material, ensuring a clean surface. A clean surface allows for a more robust and durable finish.
- Repair any holes or cracks. Use a drywall patch to fill any holes, cracks, or dents. Ensure the patch is flush with the surrounding drywall and properly adheres to the surface. This will help to prevent future problems.
- Sand the patched areas smooth. Using sandpaper, carefully sand the patched areas until they are flush with the surrounding drywall and free of any bumps or ridges. Smooth surfaces are critical for a professional-looking finish.
- Prime the repaired areas. Apply a drywall primer to the patched areas to ensure the compound adheres properly. This step is critical for a strong and lasting bond.
Patching and Repairing Drywall Imperfections
A common scenario in drywall work is patching imperfections. This step requires precision and attention to detail to ensure the patch blends seamlessly with the existing drywall. The quality of the patch directly impacts the final appearance of the wall.
- Choose the right patch size. Use a patch that is slightly larger than the imperfection, allowing for a margin of error during the patching process. This will give you a good overlap for a seamless finish.
- Cut the patch to fit the hole or crack. Use a utility knife to carefully cut the patch to the precise size and shape of the imperfection. A precise cut minimizes the risk of uneven patches.
- Apply drywall compound to the patch. Apply a generous layer of compound to the back of the patch. Ensure the patch is fully embedded in the compound to provide a secure hold. Proper application of compound is essential for a stable repair.
- Smooth the patch. Using a putty knife, smooth the compound around the patch until it is flush with the surrounding drywall. Ensure the patch is perfectly level with the surrounding area.
Importance of Proper Surface Preparation
Proper surface preparation is the cornerstone of successful drywall taping and floating. It’s not just a step; it’s the foundation for a high-quality finish. Ignoring this step can lead to costly rework and unsatisfactory results. The effort put into preparation translates directly into the longevity and aesthetics of the final product.
Tape and Float drywall is a surprisingly satisfying process, especially when the room’s layout allows for a smooth, clean finish. It’s like a mini-project of creative problem-solving, almost like watching Tig Notaro discuss how four horrible months turned into her masterful comedy album here. The whole experience reminds me that even seemingly frustrating situations can be transformed into something truly remarkable, just like a rough patch can be smoothed out with a good coat of tape and a final float.
“A well-prepared surface is the key to a successful drywall project.”
Types of Drywall Imperfections and Solutions
The table below illustrates common drywall imperfections and their corresponding solutions using the tape and float method. This helps you address various issues efficiently.
| Imperfection Type | Solution (using tape and float) |
|---|---|
| Small Holes | Use a drywall patch, apply compound, sand smooth, and prime. |
| Deep Holes | Use a larger drywall patch, apply multiple layers of compound, and sand thoroughly. |
| Cracks | Apply drywall tape to the crack, apply compound, and sand smooth. |
| Dents | Use a drywall patch, apply compound, and sand smooth to restore the surface level. |
Applying Tape
Getting the drywall seams and corners perfectly taped is crucial for a smooth, professional-looking finish. Proper taping ensures that the mud adheres well and provides a solid base for the final coat. This section details the steps, different types of tape, and techniques for achieving a flawless finish.Applying drywall tape correctly is essential for a successful drywall project.
Improper taping can lead to visible imperfections, requiring extra work and potentially affecting the aesthetic appeal of the finished product. Understanding the various types of tape and their specific applications is vital to ensure a strong and durable repair.
Types of Drywall Tape
Different types of drywall tape are available, each with its own strengths and weaknesses. Choosing the right type for a specific application is key to achieving a flawless result. Knowing when to use each type of tape will save time and effort.
- Paper Tape: Paper tape is a common and affordable choice for taping seams and small imperfections. It’s relatively easy to work with and provides a good surface for mud to adhere to. However, it’s less durable than other types and may tear easily, requiring extra care during application. Paper tape is often suitable for taping seams in areas that will not receive a lot of stress, such as interior walls.
It’s also a great option for beginners due to its affordability and ease of use.
- Fiberglass Tape: Fiberglass tape is known for its strength and durability. It’s more resistant to tearing than paper tape, making it suitable for areas that might experience more stress or impact, such as around doorways or windows. The fibers in fiberglass tape provide a better surface for mud adhesion, leading to a stronger, more resilient repair. Fiberglass tape is also more resistant to moisture than paper tape.
- Mesh Tape: Mesh tape is a reinforced type of drywall tape, typically composed of a woven fiberglass or plastic mesh. It is exceptionally strong and durable, making it ideal for repairing large holes, cracks, or heavily damaged areas. The woven structure of mesh tape provides excellent reinforcement and allows for thicker coats of mud, which is crucial for concealing significant imperfections.
Mesh tape is commonly used in areas that require superior strength and durability, such as areas with high moisture levels or heavy foot traffic.
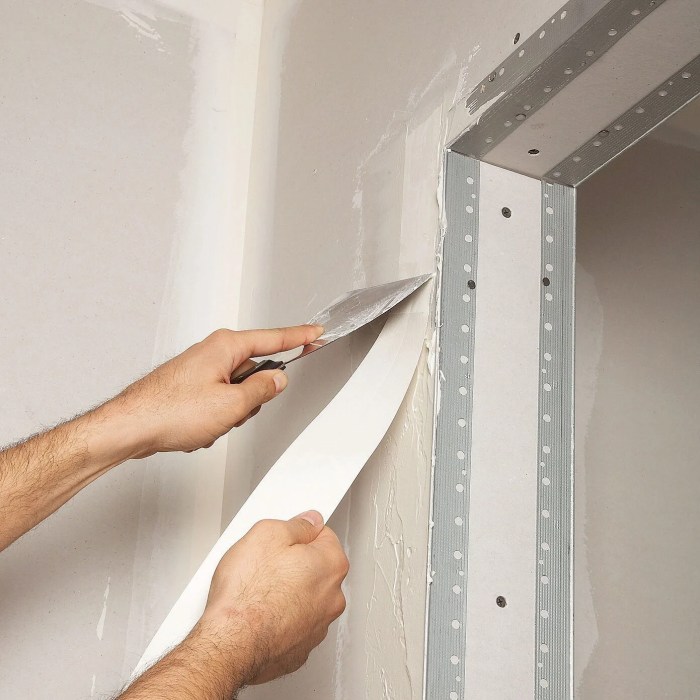
Applying Drywall Tape to Seams and Corners
Properly applying drywall tape to seams and corners is critical for a smooth and professional finish. The method used depends on the type of tape and the specific area.
- Preparing the Seam: Ensure the seam is clean and free of debris. Remove any loose particles or dust that might interfere with the tape’s adhesion.
- Applying the Tape: Apply the tape to the seam, ensuring it’s centered and pressed firmly against the drywall. Use a drywall knife or taping tool to smooth out any wrinkles or bubbles. Overlap the tape slightly to ensure a strong bond. For seams, use a continuous strip of tape, while corners might require several strips, carefully overlapping.
- Pressing the Tape: Press the tape firmly onto the drywall to ensure proper adhesion. Use the taping knife to apply even pressure along the tape’s length. Ensure there are no gaps or air pockets. Use firm, consistent pressure to press the tape flat against the surface.
- Finishing: Once the tape is applied, use a taping knife to smooth out any wrinkles or bumps. Apply a thin layer of mud over the tape, ensuring it’s completely covered. This ensures a uniform and even surface. Use a taping knife to apply an even layer of mud over the tape, ensuring there are no gaps. Smooth out the mud with the knife, working from the center outward.
Taping Corners
Taping corners requires special attention to detail. The techniques for taping interior and exterior corners differ.
- Exterior Corners: For exterior corners, use a corner bead, which is a special type of metal or plastic strip that fits into the corner. Tape around the corner bead using the same techniques as for seams, ensuring the tape overlaps properly and is pressed firmly against the corner.
- Interior Corners: For interior corners, use a combination of techniques, including applying tape to the corner itself and using corner bead to give the corner support and prevent cracking. This ensures the integrity of the repair and allows for a smooth, even finish. Ensure that the tape is pressed flat against the corner to avoid future issues.
Applying the Joint Compound
Applying joint compound is a crucial step in achieving a smooth, professional-looking drywall finish. Proper application requires careful attention to detail, using the right tools and techniques for different types of compound and applications. This section will guide you through the steps and considerations for a successful joint compound application.
Types of Joint Compound
Various types of joint compound cater to different needs. Understanding the properties of each type will help you choose the right compound for the job. Different types are formulated for varying levels of strength, smoothness, and drying times. This choice directly impacts the final result.
- All-Purpose Compound: This is a versatile option for most taping and finishing applications. It’s suitable for patching small holes and imperfections, and for smoothing out joints after taping. Its moderate strength and drying time make it a practical choice for a wide range of projects.
- Lightweight Compound: Designed for thin coats and faster drying times, it’s particularly useful for skim coating and light repairs. It’s ideal when a quicker turnaround is necessary, or for areas where a very thin layer is needed.
- High-Strength Compound: Ideal for larger repairs, this compound provides exceptional strength and durability. It’s perfect for filling deep holes or patching extensive damage. Its high strength means a more robust repair, capable of withstanding stress over time.
Applying Thin Coats, Tape and Float Drywall
Applying thin coats of joint compound is essential for achieving a smooth, even surface. It’s vital for getting an even texture and ensuring the final finish is smooth.
- Preparation: Ensure the area is clean and free of dust or debris. This is a crucial step that often goes overlooked, leading to uneven surfaces. A clean surface allows the compound to adhere properly.
- Application: Use a putty knife to apply the compound in a thin, even layer, following the contours of the joint. A smooth, consistent application ensures a clean finish and prevents unevenness.
- Tools: A 4-6 inch putty knife is generally ideal for thin coats, allowing for controlled application and even coverage.
Mudding and Floating
Mudding and floating are techniques used to fill and smooth joints. They’re essential for achieving a uniform surface.
- Mudding: This technique involves applying a thicker layer of compound to fill the joint. A thicker layer is necessary to properly fill the space between the drywall panels. This step often needs several applications to ensure a complete fill.
- Floating: After mudding, floating is the next step to create a smooth surface. This involves using a wide, flexible tool to even out the compound and remove any imperfections. The floating process ensures a smooth and even texture.
- Tools: A 6-12 inch drywall knife is commonly used for mudding and floating. This allows for sufficient coverage and control. Other tools, like a taping knife, may also be used depending on the size and depth of the joint.
Smoothing and Finishing
Smoothing and finishing are the final steps to ensure a flawless surface. This requires attention to detail and proper tools.
- Technique: Use a taping knife to smooth out the compound, removing any excess and creating a smooth surface. Proper smoothing is crucial to avoid noticeable ridges or imperfections. Using the correct technique is vital for a professional result.
- Tools: A taping knife, or a variety of drywall knives, is crucial for smoothing and finishing. The choice of knife will depend on the thickness of the compound layer and the area being worked on.
Floating the Surface
Floating is the crucial final step in the tape and float drywall process. It’s the stage where the imperfections from the taping and joint compound application are smoothed out, leading to a flawless, even surface. A properly floated surface is a prerequisite for a beautiful and durable finish. This stage requires precision and attention to detail, ensuring the surface is ready for painting or further finishing.Floating involves the application of a thin layer of joint compound over the taped and already-applied compound, leveling the surface and achieving a smooth, consistent finish.
This process requires careful technique to avoid creating new imperfections or unevenness.
Techniques for a Smooth Surface
Achieving a smooth and even surface during floating is essential for a professional-looking result. Different techniques cater to various situations, and understanding them is key to achieving the desired outcome. Consistency and proper tool usage are important.
- Using a Float Tool: The float tool, with its textured surface, is the primary tool for floating. The texture of the float helps to smooth out the compound and remove any excess, while simultaneously distributing the compound evenly. Proper pressure and strokes are crucial to avoid creating dents or dips. The type of float (e.g., medium, coarse) affects the final texture.
For instance, a medium-grit float is suitable for a smoother finish, whereas a coarse float is used for areas that require more significant smoothing.
- Controlling Pressure and Strokes: Applying even pressure is vital during floating. Uneven pressure can result in uneven surfaces. Consistent, overlapping strokes are key to distributing the compound evenly. The overlapping pattern helps prevent streaks and ensures thorough coverage of the joint area. Avoid applying excessive pressure, which can lead to dents or unevenness.
The stroke should be firm but not forceful. For example, consider the difference between a light touch on a delicate surface versus a heavy hand on a thicker compound layer. The proper pressure ensures a consistent finish.
- Working in Sections: Working in smaller, manageable sections ensures that the compound doesn’t dry out before it can be properly floated. This approach allows for better control and prevents any unwanted variations in the finish. Starting with a smaller area, like a single wall section, allows for better control and consistency. It is a way to avoid leaving large sections with different levels of dryness, thus preventing the need to re-wet compound, which can create issues with unevenness.
Tools and Materials
The right tools and materials are essential for achieving a professional finish. This includes the specific tools and the amount of compound needed.
- Float Tool: Different types of floats are available, each designed for specific applications and textures. The selection of the right float is important for achieving a desired finish. For instance, a wide float is ideal for larger areas, whereas a narrow float is more suitable for smaller details. Using the correct float tool prevents unnecessary adjustments and creates a smooth, even surface.
- Joint Compound: A good quality joint compound is crucial for achieving a smooth and durable surface. The consistency of the compound should be smooth, easily workable, and not too thick or too thin. The compound should be spread evenly and not be too dry.
- Putty Knife: A putty knife is essential for spreading and smoothing the joint compound before floating. A putty knife with a flat edge is best for smoothing out compound and preparing the surface for the float. The putty knife is also useful for removing any excess compound.
- Bucket: A bucket is used to hold the joint compound and keep it ready for use. A clean bucket is crucial to avoid introducing impurities to the compound.
Importance of a Smooth Finish
A smooth finish is crucial for a professional-looking drywall surface. It ensures a uniform and aesthetically pleasing outcome, preparing the surface for the final stages of the project, such as painting or other finishes.
- Appearance: A smooth surface creates a professional and polished look, unlike an uneven one that may stand out, making the project less visually appealing. A smooth surface will provide a consistent backdrop for any subsequent decoration.
- Durability: A smooth surface is more resistant to imperfections and marks. This is because there are fewer crevices or irregularities that can catch dust or dirt, making the surface easier to maintain.
- Preparation for Finishes: A smooth finish is necessary for achieving a high-quality, even surface that can accept painting or other finishes without creating additional issues.
Finishing Touches and Inspection
The tape and float method, while effective, requires meticulous attention to detail in the final stages. Proper sanding and finishing are crucial for achieving a smooth, flawless surface. A thorough inspection process, encompassing various checks, ensures the quality of the work and prevents costly rework later on. This meticulous approach guarantees a durable and aesthetically pleasing finished product.
Sanding and Finishing the Surface
The sanding process removes imperfections and ensures a smooth, uniform surface. Different grits of sandpaper are crucial for achieving the desired level of smoothness. Starting with a coarser grit (e.g., 80-120) to remove significant irregularities, followed by progressively finer grits (e.g., 150-220) to achieve a smooth finish, is the recommended approach. A final sanding with a very fine grit (e.g., 220-320) helps to achieve a mirror-like sheen and prepare the surface for the final coat.
Always use a sanding block to ensure even pressure and prevent creating new imperfections. The sanding process should be performed in the direction of the joint to avoid creating visible scratches.
Importance of Thorough Inspection
A thorough inspection process is critical to detect any imperfections, ensuring a high-quality final product. It helps catch issues before they become more difficult and costly to resolve. This proactive approach prevents rework, which can be time-consuming and costly. Furthermore, a careful inspection ensures customer satisfaction, which is vital for building a positive reputation.
Methods for Checking for Imperfections
Visual inspection is a fundamental aspect of the process. Checking for irregularities, such as uneven surfaces, gaps, or lumps, is crucial. Using a level and straightedge can identify any significant deviations from flatness. Additionally, a close visual inspection with a light source at various angles will reveal minor imperfections that might be missed during the initial inspection.
Tape and float drywall is a pretty straightforward process, but sometimes it can feel a bit overwhelming. It’s all about meticulous taping and smoothing, and honestly, it can be a great way to reflect on your own life’s experiences and processes. Thinking about the patience needed to perfect a smooth finish, for example, can be a nice parallel to how one approaches Write About Your Own Life .
Ultimately, the careful precision required for a quality finish in drywall really mirrors the effort and attention needed to craft compelling narratives in personal writing. This type of thoughtful process, from the taping and floating of drywall to the writing process itself, is what makes it so rewarding.
Use a flashlight or other light source to inspect the surface from different angles, as shadows can hide imperfections. A good rule of thumb is to use multiple methods to detect imperfections.
Tape and Float drywall is a fantastic way to achieve a smooth, professional finish. While the process is relatively straightforward, sometimes you might need a little extra pizzazz. Think about how you could add a touch of visual interest to your project, like using a glossy effect in your design software. You can definitely add gloss in Illustrator, for instance, to create a really polished look to your digital mockups of your drywall work, before you even start on the actual job.
Add Gloss in Illustrator can help with that. Ultimately, a well-executed Tape and Float drywall job relies on precision and a keen eye for detail.
Quality Control During the Process
Maintaining quality control during the process is essential for avoiding rework and ensuring a professional-looking final product. Regular checks and adjustments throughout the process help to maintain the desired standards. This ensures the project stays within budget and on schedule. Taking photographs or videos at various stages can help document the process and identify any issues that arise.
Documentation serves as a crucial reference point for quality control, aiding in troubleshooting and process improvements in future projects. The use of a checklist, ensuring each step is completed correctly, is also an excellent practice for quality control.
Troubleshooting and Common Issues
Tape and float drywall finishing, while generally straightforward, can sometimes present unexpected challenges. Understanding potential problems and their solutions is crucial for achieving a professional-looking, durable finish. This section details common issues and effective troubleshooting methods.A meticulous approach during the entire process, from preparation to the final inspection, significantly reduces the likelihood of encountering significant problems. Addressing issues promptly minimizes costly rework and ensures a satisfying outcome.
Sagging
Sagging in the joint compound is a common problem, often caused by insufficient support or the use of too much compound at once. Applying a thick layer of compound can lead to sagging due to its weight and the lack of proper support during drying. This can also occur if the drywall is not adequately supported, or if the compound dries unevenly, creating pockets of weakness.
- To prevent sagging, apply compound in thin, manageable layers, allowing each layer to dry completely before adding the next. Use a taping knife to smooth the compound evenly. Ensure the surface is adequately supported during the drying process, particularly for larger areas.
- If sagging occurs, carefully scrape off the excess compound using a putty knife. Avoid using excessive force to prevent damaging the surrounding drywall. Apply a fresh coat of compound, working in small sections, and allow it to dry completely before continuing.
Wrinkles and Ripples
Wrinkles and ripples in the joint compound often stem from improper application techniques, such as working with too much compound or using an inadequate taping knife. These imperfections can also arise from uneven drying or inconsistent pressure during application.
- Apply compound in thin layers and use a taping knife to smooth the compound evenly and consistently. Apply consistent pressure during application to ensure a uniform surface finish. Work in small sections to maintain control.
- For wrinkles, use a damp sponge to smooth the surface while the compound is still wet. This can help to restore the desired smoothness and prevent the wrinkles from setting permanently. If the ripples are significant, carefully remove the affected area and reapply the compound using proper techniques.
Uneven Surfaces
Uneven surfaces are a result of inconsistent application of compound or a lack of precision in the initial preparation. Uneven drywall surfaces can also contribute to this issue, and inadequate sanding can result in a rough surface.
- Ensure the drywall is properly prepared before applying the compound. Use a drywall knife or sanding tools to ensure a smooth, consistent surface before beginning to apply compound. Work in small sections to maintain control.
- Apply the compound in thin layers, ensuring a smooth and uniform application. Use a taping knife to smooth the surface evenly, ensuring consistent pressure and movement. Allow each layer to dry completely before moving on to the next.
Cracks
Cracks in the joint compound can appear due to various reasons, including inadequate moisture control during the drying process, improper taping techniques, or insufficient support for the drywall. The movement of the structure during drying can also lead to cracks.
- Ensure proper ventilation to prevent moisture buildup, especially during the drying process. Use a humidity meter to ensure adequate moisture control. Support the drywall effectively during the drying process, particularly for larger areas. Use proper taping techniques, ensuring the tape is adequately adhered to the joint and that the compound is applied evenly and thoroughly.
- If cracks appear, carefully scrape off the affected area using a putty knife. Apply a fresh coat of compound, working in small sections, and allow it to dry completely before continuing.
Variations and Alternatives
The tape and float method, while effective, isn’t the only way to finish drywall. Understanding its strengths and weaknesses, along with comparing it to other techniques, allows for informed decisions on the best approach for specific projects. This section explores alternative drywall finishing methods, highlighting situations where tape and float excels and discussing ideal surface types and project applications.The choice of drywall finishing method often depends on factors such as the desired level of smoothness, the complexity of the project, and the available time and resources.
Each method has unique characteristics, and understanding these differences is key to selecting the right one for your specific needs.
Comparison with Other Methods
Tape and float, often favored for its versatility and relative ease, contrasts with other methods like drywall mudding and topping compound applications. Drywall mudding, which often involves multiple coats, can be time-consuming but is suitable for achieving a smooth, level surface, especially for areas that need extensive repair or for a very fine finish. Topping compound, on the other hand, is a faster approach for simple repairs and touch-ups.
| Method | Description | Advantages | Disadvantages |
|---|---|---|---|
| Tape and Float | Uses joint compound, tape, and a float to create a smooth, durable finish. | Versatile, relatively easy to learn, suitable for most residential projects. | Can be labor-intensive for large areas, requires meticulous preparation. |
| Drywall Mudding | Multiple coats of joint compound are applied to create a smooth finish. | Ideal for extensive repairs, creates a very smooth surface. | Time-consuming, requires more skill and experience. |
| Topping Compound | A fast-drying compound applied directly to the surface. | Fast, easy for small repairs. | Not as durable as tape and float, less suitable for large areas. |
Ideal Surfaces for Tape and Float
The tape and float method works well on various surfaces, particularly those with significant imperfections that require careful preparation. The use of tape ensures a consistent and reliable bond, while the floating process evens out the compound for a uniform finish.
- Uneven or damaged surfaces: Areas with noticeable cracks, holes, or dents benefit from the precision and repair capabilities of tape and float. The tape can effectively cover imperfections, and the joint compound can fill in the gaps, providing a smooth and uniform surface.
- Drywall joints: This is the most common application for tape and float. The method effectively smooths out seams and imperfections in drywall installations, resulting in a professional-looking finish.
- Existing wall surfaces: When repairing or refinishing existing walls, tape and float is often the preferred method, offering flexibility and a high degree of control over the surface texture.
Suitability for Different Projects
Tape and float’s versatility makes it suitable for both residential and commercial projects, but the complexity and scale of the project will influence the practicality of this method.
- Residential projects: Tape and float is frequently used in residential applications like apartments, houses, and condos. Its relative ease of use and ability to create a high-quality finish make it ideal for most interior wall renovations.
- Commercial projects: While feasible, the extensive nature of commercial projects may make alternative methods, such as drywall mudding, more suitable for larger areas requiring a fast turnaround. The time investment for extensive tape and float applications might be prohibitive for high-volume commercial projects.
Safety Considerations
Working with drywall involves handling various materials and tools that can cause injuries if safety precautions aren’t followed diligently. Proper safety measures are crucial not only for preventing accidents but also for ensuring a productive and efficient work process. A well-maintained and safe workspace minimizes the risk of injuries and allows for a more comfortable and focused work environment.Maintaining a safe environment is paramount when undertaking any construction project, and drywall work is no exception.
A proactive approach to safety is essential to minimize risks and ensure the well-being of all involved.
Safety Equipment Needed
Adhering to safety protocols is fundamental to preventing injuries during drywall installation. Appropriate safety gear is essential for mitigating risks and ensuring a secure work environment. A well-equipped worker is a safer worker.
- Eye protection (safety glasses or goggles): Essential for shielding eyes from flying debris, dust, and potential splashes of joint compound.
- Respirators (dust masks): Critical for controlling airborne dust, which can cause respiratory problems. Using a respirator with appropriate filters is important for minimizing exposure to dust particles.
- Hearing protection (earplugs or earmuffs): Necessary for protecting against the noise of power tools, which can lead to hearing loss over time.
- Work gloves: Provide protection against cuts and abrasions from drywall materials and tools.
- Safety shoes or boots: Offer protection against falling objects and provide stability on uneven surfaces.
Ventilation and Dust Control Measures
Adequate ventilation and dust control measures are critical to maintaining a healthy and safe working environment. Dust particles from drywall and joint compound can be hazardous if not managed effectively.
- Proper Ventilation: Ensure sufficient ventilation in the work area to remove dust and fumes. Open windows and doors, or use fans, to promote airflow and disperse dust particles.
- Dust Control Techniques: Use damp cloths or wet methods to control dust during sanding and other procedures. Cover work areas with drop cloths or plastic sheeting to contain dust and debris.
- Regular Cleaning: Regularly clean the work area to remove dust buildup and prevent dust accumulation, which can cause hazards. This includes vacuuming and wiping surfaces to maintain a clean workspace.
Importance of Proper Safety Practices
Prioritizing safety practices is paramount in preventing injuries and promoting a safe working environment. Safety protocols are essential to minimize the risk of accidents and ensure a smooth and productive workflow.
- Injury Prevention: Proper safety practices significantly reduce the risk of injuries, such as cuts, abrasions, and respiratory problems, which can lead to lost time and medical expenses.
- Maintaining Productivity: A safe work environment fosters a productive workflow by minimizing distractions related to injuries. Safe workers are more focused and efficient, leading to higher output.
- Legal Compliance: Adhering to safety regulations is essential for avoiding legal issues and ensuring compliance with local and national standards.
Ultimate Conclusion
In conclusion, Tape and Float Drywall offers a comprehensive approach to achieving a smooth and durable drywall finish. By carefully following the preparation, application, and finishing steps, you can achieve a high-quality result. Remember that practice and attention to detail are crucial for success. This guide has provided a solid foundation for understanding this technique, and we hope you find it helpful in your next drywall project.